Access WSL2 .vhdx on External Drive Within a Windows 10 System Image
This post documents how to hack a Windows registry entry to gain access
to the contents of a WSL2 .vhdx volume
which resides within a Windows 10 System Image on an external disk.
Scenario
Everyone should have a backup strategy that works for them in terms of
hassle factor and capability: your strategy should have no more hassle
than you are willing to put up with to give you a daily backup
capability.
On macOS, I use the excellent Carbon Copy Cloner. On Windows 10 I use the built-in Create a system image. In both cases, I store the backup on an external drive. Yesterday, due to a stupid git rebase user error, I lost some commits on a repo that was stored within my WSL2 Ubuntu machine. “No worries,” I thought. “I’ll just grab the commits from my backup”. I followed these steps to mount the System Image as a local drive and navigate to the file…“oh wait. The file is within the WSL image. [:sad trombone:]”.
With help from WSL2 Twitter celebrity Craig Loewen I used this process to get my lost commits.
If you don’t already have WSL2, you should totally get it. Get started at <https://aka.ms/install-wsl>. I was a Mac user from 2007 until I joined Microsoft in June 2019. If not for WLS2, I’d still be a Mac user.
Update 2022-08-23
New from Craig Loewen.
If you are using the “Store” version of WSL2, that is, installed from https://aka.ms/wslstorepage, you can use the --import and --export commands for wsl in PowerShell.
- In a PowerShell (maybe elevated for good measure, not sure if it’s necessary), shut down wsl.
wsl --shutdown. - Get the distro name of the distro whose VHD you want to export.
wsl -l -v. - Export the distro to a .vhdx file.
wsl --export <your distro name> .\yourDistroName.vhdxThis will be a large file. - Move the
.vhdxfile to your new machine. - Import the vhd.
wsl --import --vhd <your distro name> <Install Location> .\yourDistroName.vhdx.
How to Access WSL2 .vhdx on External Drive Within a Windows 10 System Image
We will edit the Windows registry to point a new Debian WSL2 distribution to the .vhdx file on the external drive.
Get the fully qualified path to the .vhdx file
Mount the System Image that contains the .vhdx file and capture its
fully qualified path. In my case this is:
K:\Users\edburns\AppData\Local\Packages\CanonicalGroupLimited.UbuntuonWindows_79rhkp1fndgsc\LocalState
Create a fresh WSL2 Debian distribution so you can edit its Windows Registry entry without fear of damaging anything
-
Make it so when you do
wsl -l -vin Windows PowerShell you do not see a distribution namedDebian. If you do see one, figure out how to save it aside. We want to install a fresh Debian distribution. If you already have one, you’ll need to move it aside so you don’t damage it. -
Install a fresh Debian (RIP Ian Murdock) distribution from the Windows store. Create a userid when asked.
-
Exit the Debian and shut down WSL2 with the command
wsl --shutdownin PowerShell.
Edit the Windows Registry entry for the .vhdx file of the fresh Debian distribution
This is the secret sauce! I use regedt32, but you can use any other
registry editor. In your registry editor, navigate to this entry and
expand it.
Computer\HKEY_CURRENT_USER\SOFTWARE\Microsoft\Windows\CurrentVersion\Lxss
This image shows what I see under the Lxss entry.
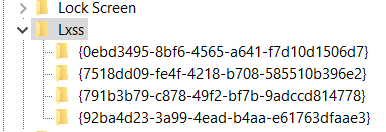
Carefully select each entry until you find the one whose
DistributionName sub-entry is exactly Debian.
Select the BasePath sub-entry and Modify its value. Set the value to
be exactly the fully qualified path to your external .vhdx file, not
including the filename or trailing slash.
Exit the Windows Registry.
Run the “Debian” image and get your files
In Windows PowerShell, run wsl -d Debian. This should boot up the
WSL2 into the .vhdx, allowing you to get the missing files.
PRO TIP!
The super handy \\wsl$\<distroname> usage in Windows File Explorer
should work also. In my case I was able to get the files by visiting
\\wsl$\Debian\home\edburns\workareas in Windows Explorer.
Thanks again to Craig Loewen for this tip.